MISys Manufacturing – Changing Bill of Material Components – Add or Remove
Following from our “Changing Bill of Material Components – Replace” blogpost , in this post we will cover how to ‘Add’ or ‘Remove’ Bill of Material (BOM) components to/from existing BOMs. Adding a component to a BOM will allow the user to add a new item with a specified quantity to selected BOMs. Removing components will delete an item that’s currently in selected BOMs.
The process of adding or removing a BOM component are quite similar, except for having to assign a quantity when adding a component. The ‘Quantity’ identified in the ‘Add’ screen will insert the new item into the selected BOMs with the specified quantity as the ‘Required Quantity’.
Please note that if the item being added to a BOM already existed in the BOM, same item will be added as a new BOM detail (i.e., item will be listed twice in the BOM). Similarly, when removing an item from a BOM, if the item is listed multiple times in a BOM, all lines specifying the selected item will be removed.
To remove a BOM component, the first step is to identify the item to be deleted:
Navigate to:
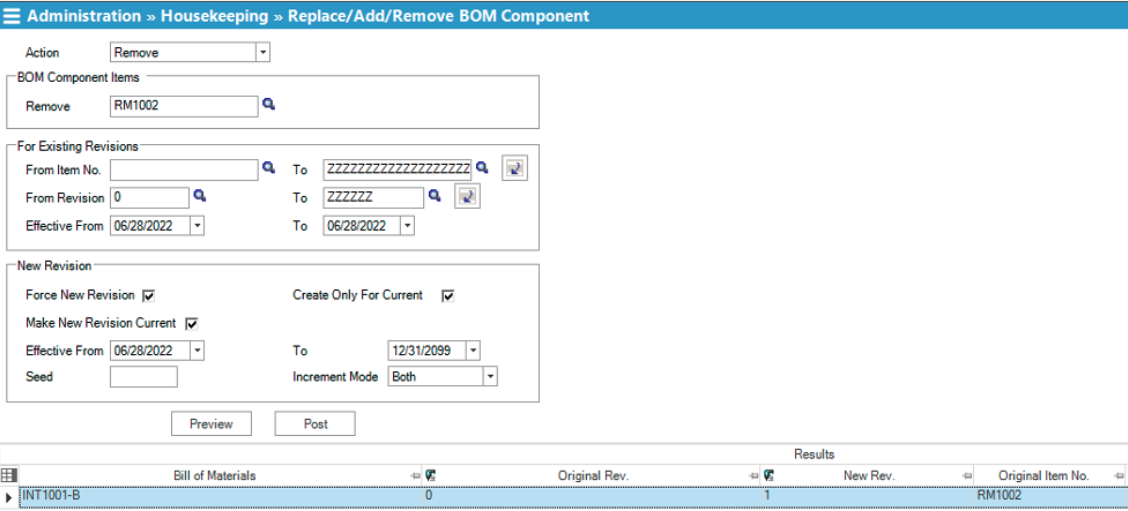
Administration | Company Options | Housekeeping | Replace/Add/Remove BOM ComponentSelect ‘Remove’ as the ‘Action’
Select the item to be deleted in the ‘Remove’ field in the ‘BOM Component Items’ box
Next step is to identify the assembled items that the change will affect and the specific revision numbers as well as effective dates (if applicable) for the Bills of Materials for those items. In the ‘For Existing Revisions’ box:
Select the unbroken range of assembled items that should be updated (if the assembled items that will be modified do not form an unbroken range, then the change must be applied in installments)
Select the range of revision numbers to be included (this selection will apply to all items selected in previous step).
Select the Effective Dates for the Bill of Material Revisions you wish to affect. Note that Bill of Material Revisions with Effective Dates outside this range will not be affected by this process
Finally, in the ‘New Revision’ box:
Determine whether the changes made should be used to create a new BOM revision for the assembled items by ticking the ‘Force New Revision’ box
Tick the ‘Create Only for Current’ box if you wish to delete components only in current BOM revisions. BOM Revisions that are not the ‘Current’ revisions will not be affected by this process.
Tick the ‘Make New Revision Current’ box if you wish to make the revision being created to become the ‘Current’ revision after this process.
Assign ‘Effective Dates’ (if applicable) to the new BOM revisions to be created.
In the ‘Seed’ field, enter a revision number you would like to be used for the new revisions. This will be used if there are no existing revision numbers for the applicable assembled item.
In the ‘Increment Mode’ list, as per MISys Context Help Section:
Alpha (A-Z) - To create a new BOM Revision using the specified seed and incrementing only the alphabetic portion of the number (e.g., the next Revision after A2A is A2B, the next Revision after AA2 is AB2).
Numeric (0 – 9) - To create a new BOM Revision using the specified seed and incrementing only the numeric portion of the number (e.g., the next Revision after A2A is A3A, the next Revision after AA2 is AA3).
Both - To create a new BOM Revision using the specified seed and incrementing both the numeric and alphabetic portions of the number (e.g., the next Revision after A2A is A2B, the next Revision after AA2 is AA3).
When all information has been entered as above, click the ‘Preview’ button to see a list of all the changes that will take place. Once satisfied with the ‘Preview’, click the ‘Post’ button to apply changes as planned. It is always a good idea to make a backup before the changes are applied, so click ‘Yes’ when promoted to make a backup of your data.
If you have any questions about Changing Bill of Material components in your MISys system, please feel free to contact us here at Central Nervous Systems.